
The binding is almost done. Part four will cover how to hand stitch the binding to the back. The edge needs to be folded over to cover the raw edge of the quilt and stitched down. There are two key things to this process. First is to ensure the corners have perfect miters front and back. Second, the fold needs to be filled with batting. I use a whip stitch by hand.
Begin by picking a spot on one side to start. Bring the binding over the raw edge firmly to the back so the batting fills the binding, and the edge covers your stitching line on the back. I like to just pin it down, and use three or four straight pins in a row to hold the binding down.

Knot your thread and hide the knot under the binding.

Take another stitch to move the thread to the stitching line.

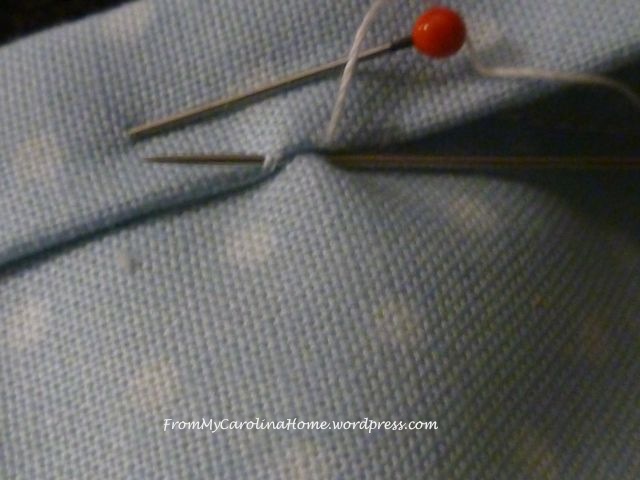
For right handed quilters, put your needle down in the quilt, push it to the left a tiny distance, then bring it up catching just the edge of the binding.

With the next stitch, place the needle in the quilt directly below the binding where the previous stitch exited the binding.

Push to the left and repeat. Periodically sweep the needle under the un-stitched binding to smooth out the layers.

If you are left handed, do the same but work towards the right.
When you come to the corner, continue stitching the binding all the way to the edge of the quilt. Then, push the needle back to the corner point on the back.

Fold the corner down, and pin it a short way away to keep it in place.

Take a stitch in the corner of the folded edge. This pulls the corner to the exact spot needed for a perfect miter.

Bring the needle back for another stitch in the same place.

Stitch up the folded corner to the point on the back only to secure it.
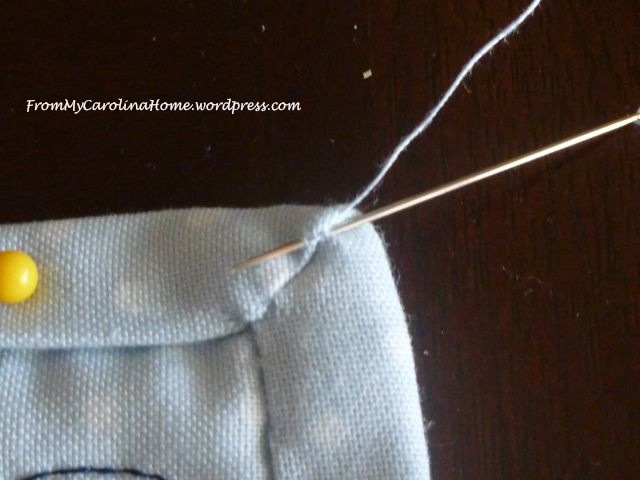
Then stitch back down still on the backside and continue down the next edge of the binding. Repeat for the remaining corners until the entire quilt is done.

Finger press the corner to a sharp point. Your corner will come out perfect on the back…

and the front without any stitching on the front!

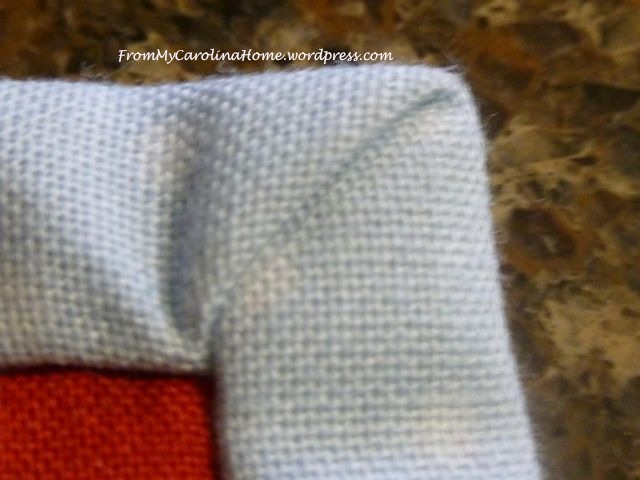
Perfect mitered corners on both sides. This same process works for 90-degree four-corner quilts, and 60-degree hexagon six-corner quilts.
For new quilters, I hope this tutorial has helped you learn how to bind a quilt. For experienced quilters, I hope there was a tip or two you could use. If you missed any of the first three parts, click on the Tutorials category in the right sidebar.
Happy Quilting!

Lovely description; clear, crisp photos and excellent narrative. Your corners look great !~! Thanks for the tute.
Thanks for your tutorial.
great tutorial! very easy to follow!
Thank you so much for partying at Needle and Thread Thursday!
🙂 Kelly @ My Quilt Infatuation
Very clear tutorial with good pictures, bravo! Greetings from Greece!
Great tutorial.
Leona
Aughhhhh those corners…mine will NOW improve! LOL!! THANK YOU for the tut!
I do hand stitch bindings…sometimes! Great tutorial!
Great instructions! I’m a lefty and do it exactly how you showed! If any newbies follow your instructions, they will be experts in no time!!
Thank you, Peggy!!
Great tutorial! Thanks for sharing.
Freemotion by the River Linky Party Tuesday
How do you tie the finishing knot when you’ve finished stitching a length? Mine either come unraveled or show.
Good question, Terri. I take a stitch and loop the needle through the thread once for a small knot three or four stitches from the finish point. It is part of the whip stitch so it doesn’t show. I do it again on the next to last stitch, and again on the last stitch – so I have three tiny knots in a short space. Then run your needle under the quilt for the length of the needle and pull the thread out away from the finishing point. Pull slightly and cut it off at the quilt. It will pull back slightly and hide the end. Hope that helps!
Thank you for all of your great tutorials. I was determined a couple of years ago to master my bindings and worked very hard at improving them. I entered a quilt to be judged and the comment was the binding should be the same size front and back, what! I was cutting the strips 21/2 and using a 1/4″ seam.
Thank you for clearing that up and the great pointer on finding the stopping point at the corners. I do stitch down the miter on both sides.
It warmed my heart this morning when I clicked on your site and say the picture of the valley. I used to live in the valley and miss that view so much.
Thank you for your wonderful comment!! Come back anytime for the view, I do change the picture from time to time to reflect the current weather or season.
I am new at quilting,so this tutorial was very helpful. My only question would be, is the miter fold toward the outside of my binding or folded toward the inside?
This is a great tutorial. Thanks.
I am having troubles with my binding being wavy when I am done sewing it on. Can you make some suggestions on what I am doing wrong?
Pulling on the binding as it is sewn to the quilt will do this.